The Toolbox will soon be registered with Technorati and put on their lists so it will be easier for new readers to find. 74X7QZFQ956C Bruce
Thursday, January 31, 2013
Sunday, January 27, 2013
Forum on The Toolbox
Hello, readers
New to The Toolbox is a discussion board where repair problems, news items, comments, etc. can be posted.
Anyone can sign in and post, so feel free to use it. You can log in with Facebook, Twitter, G mail, etc.
Thanks
Bruce
New to The Toolbox is a discussion board where repair problems, news items, comments, etc. can be posted.
Anyone can sign in and post, so feel free to use it. You can log in with Facebook, Twitter, G mail, etc.
Thanks
Bruce
Sunday, January 20, 2013
2005 Sprinter no crank, no start
Hello, and thanks for checking out this post on a Sprinter intermittent no start, no crank issue. The vehicle in question this time is a high-mileage Sprinter delivery route truck with a diesel engine. The problem cropped up with no apparent pattern, failing to crank at random times, and would often go some time with no problem. The starter and alternator had already been changed with no effect on the issue, and had been to the shop several times without success in replicating the problem. Finally, it was towed in after a complete failure.
Another mechanic started to look at the vehicle and was now able to reproduce the no crank several times. Oddly, when a no crank event happened, the electric A/C fan would run at key on, then nothing would happen when the key was further turned to start. I am always a little concerned about complaints of starting issues on Sprinters; if the first crank attempt fails to start the engine, the key has to be turned back off before trying to crank again. This seems to be common on foreign vehicles, and may trip some people up. However, the fleet that owns this Sprinter also has several others, so driver knowledge shouldn't be a problem. The starter relay is located behind the access panel under the driver seat. If you hold onto a starter relay and turn the key to start, you can feel the relay click when it energizes. That doesn't mean it is necessarily putting out power, but you know it has power and ground to energize it. This one was not clicking during a no crank, so the problem had to be between the key switch and the relay.
At this point the other tech’s shift ended and it was my turn to take a stab at the problem. With the knowledge of what part of the circuit to look at for the issue, I looked at the wiring diagrams the other tech had printed from Mitchell. I was looking at the wiring for some commonality between the starting circuit and the HVAC fan, when my shift manager came up with a diagram isolating the starting circuit. It was obvious that a couple of connections in that circuit were worth looking into. Particularly suspicious was a connection above the fuse block, and a splice joint below the seat. The engine control module itself was also worth thinking about.
Below is a condensed version of the starting circuit. There are several things I find a little strange about how the circuit is wired. First, the starter relay gets power off the ignition switch itself. Normally a relay is powered from the battery so that reliable, high amperage power is available to the starter solenoid. The power from the switch signals the ECM to send ground to the starter relay to energize it. Also, the module pin marked starter motor relay +12V supply really isn't relay supply, but only power to energize the relay. It also energizes the fuel pump relay, which is not shown in my diagram. I understand that it is desirable to control the starter relay through the ECM, but the way this is wired, the starter solenoid is in reality getting its power directly from the 12GA wire from the ignition switch! The solenoid power also has to go through 4 connectors on its way to the starter. This seems to me to be a rather unreliable way to wire a starter circuit, as each of these connectors is a potential problem spot, especially as a vehicle ages. So much for the myth of fine German engineering.
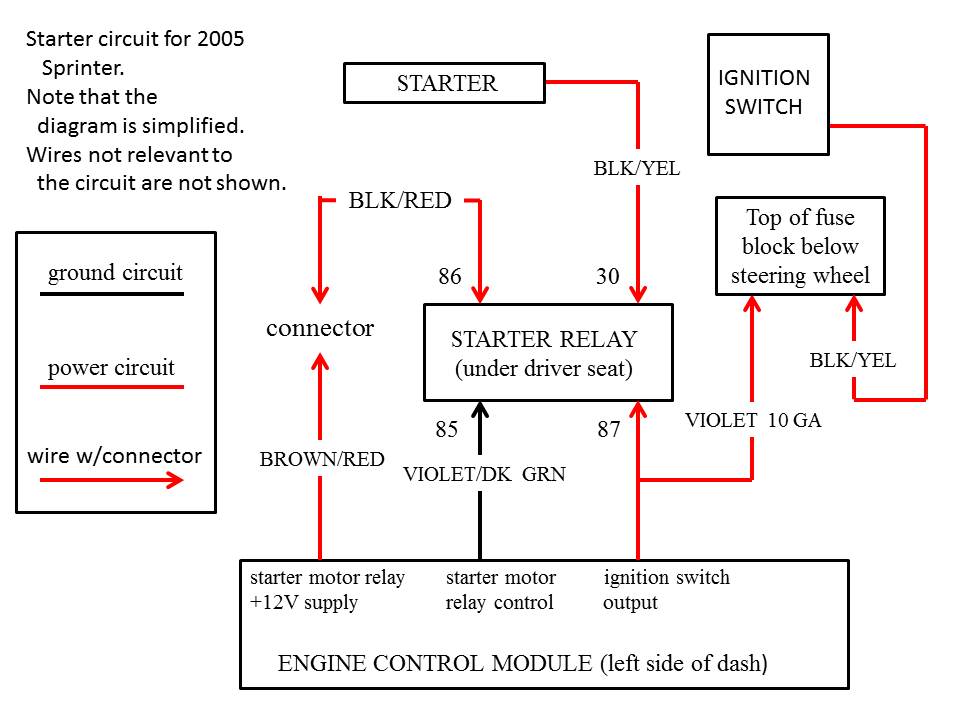 |
| 2005 Sprinter starter circuit |
Anyway, the fuse block under the steering column is easy to remove, so this seemed like a good place to start. Dropping the fuse block from the column caused the no crank issue to reappear, so it seemed as if one of the connectors there was at fault. The 12GA black/yellow wire from the switch goes to a connector at the right side of the block, and it re-emerges at another connector on the left side of the block as a 10GA violet wire. I jumped a wire between the two and the vehicle started. There is probably a fusible link across the top of the fuse block to protect the switch wire, but I had no desire to take the block apart and spend the next 2 hours chasing small parts across the shop just to find out. I cut the two wires off at their respective connectors and soldered them together, then bolted the fuse block back up.
I wanted to also check the starter relay under the driver seat to make sure its connector was sound. I grabbed the wires near the connector and pulled with about 10 pound of force, while trying the starter. The vehicle failed to start as long as I pulled on the wires. This is a sure sign that the connectors in the relay plug have lost their tension and can cause an intermittent fault. The OEM relay has 2 large spades that I didn't have a connector for, so I wired in a standard 5 blade relay with new terminals.
The last thing I wanted to check out was the splice in the violet wire the diagram said was under the driver seat, but it was not there. There is a fork in the harness under the vehicle, (under the seat area) so I assume that is where it is. I didn't break into that as it was in original condition, well-wrapped, and I didn't want to disturb it since I was pretty confident the problem had been solved.
It has been over a month since repair and the vehicle is driven daily, so it looks as if one or both of the things I did fixed the problem. As to why the HVAC fan ran when the truck failed to start, I haven’t really come to a conclusion as to the answer. It may be a quirk in the input/output circuits or programming of the ECM. One of these days we will replace a bad fuse block in one of these and I can blow it apart and check the guts, but one may want to insert a piece of fusible link wire between the wires I soldered together so the switch doesn't burn up in the event of a short or an overload in the starter circuit.
Thanks for checking out this post, and check back soon for more.
Bruce
Tuesday, January 1, 2013
Trailer ABS light on solution
Hello all, and welcome to this post on an ABS problem and a solution. I will use this opportunity not only to talk about ABS problems in general, but also about the diagnostic process for any system.
Once again I inherited a problem that previous efforts had failed to solve. This time the vehicle was a fairly new Great Dane dry van with the ABS light on. The story was that everything that could be replaced pertaining to the system had been changed out, without success. At least two shops had worked on the problem. Curiously, the customer said that the light only came on when the trailer was hooked to a Volvo tractor.
This type of problem, where lots of diagnostic work has been done without success, is often a good opportunity to hook a new customer and gain status for the shop that takes care of the problem. Since lots of potential problems have already been eliminated, they can also be surprisingly easy to solve. The customer statement that the light only came on with a Volvo tractor was suspicious, but I thought maybe there was something about the ground path on the Volvo that was different that the other tractor it was hooked to.
As always, I started with just a quick visual inspection before I hooked up to the trailer. It looked to be in very good condition, and I was happy to see a very simple Meritor Wabco system with wheel sensors on the front axle. The module on top of the service relay, the modulators, and the sensors looked new. One of our customers parks his Volvo tractor on our lot and we got permission to use it. I hooked up and the ABS light was indeed on, so I pulled flash codes with the tractor by turning the ignition switch on-off-on. A 4 code was set, which is the code for wheel sensor YE 1, the curbside sensor.
Absolutely the first thing that must be checked with a sensor code on any ABS system is the wheel bearing clearance, or lash. When I jacked the wheel up I found the curbside wheel did have excessive play, and it took over 2 full turns on the adjustment nut to seat the bearings. I always set truck wheel bearings with a torque wrench at 35 foot pounds with both dual wheels and tires on, after the initial seat/back off process. If I need to turn the nut to align the lock I can safely tighten it some more, but never loosen from that setting. If that sounds like too tight an adjustment, keep in mind that you are lifting both wheels and tires, as well as the hub and drum, with that bearing nut. It is actually pretty hard to get the bearings too tight with all that weight on them. I couldn't get at the sensor to reset it, so took the wheels and drum off and tapped it in against the tone ring. The tone ring looked to be in good condition, but the sensor gap was at least 1/8 inch, so I was pretty confident I found the problem. The Wabco system seems to be especially sensitive to bearing clearance, and is one of the most common issues when a light comes on. The bearings on the other side were not as loose, but I went through the same procedure there.
I pulled the trailer out of the shop and the light went out, then the repair survived a test drive around a city block, so it was pronounced fit to return to the customer. As for the problem being only evident with a Volvo tractor, I don’t know what happened. Maybe the not-Volvo tractor they tried had no power at the trailer accessory pin. Maybe it was right after the sensor change and the air gap was good for that test. Or maybe it’s just one of those things.
This experience illustrates what I call law #1 of diagnostics: make sure the simple stuff is right before moving to more complicated/expensive possibilities. I can’t say that this trailer didn't have other problems that required the parts to fix, but to miss the basic check of bearing clearance cost the customer money and time. I am sure that most of the shop rip-off stories have their roots in this way: a customer takes his or her vehicle in to be repaired, the tech misses something simple, and lots of time and money is spent without fixing the problem. Both the shop and the customer get frustrated and the vehicle goes to another shop, where the problem is found to be simple, easy, and cheap. The customer feels the first shop tried to rip him off by selling parts and service he didn't need.
No shop will stay in business very long by blatantly ripping customers off, and I don’t think that happens very often. It is too easy to uncover a rip-off, especially when it would be as easy to investigate as in the scenario I just outlined. However, a shop can get a bad reputation after just one of these mistaken diagnosis incidents. Nobody can do everything perfectly every time, and early in my career especially, I made my share of mistakes. We as mechanics can’t be so arrogant that we don’t bounce problems off other techs or to look for help with difficulties, and we all need to keep law #1 in mind while looking at a problem. Novice techs need close supervision to make sure they don’t get off track and that they follow efficient procedures.
Thanks for looking at this post, and check back soon for a post on a Sprinter no start problem.
Bruce
Subscribe to:
Posts (Atom)